
.webp)


.webp)
DIY Car Repair Made Simple: Easy Auto Repair Solutions
Welcome to Easy Auto Repair Solutions, the place where car owners learn how to take control of their vehicle’s maintenance without breaking the bank. If you’ve ever wondered whether you can handle basic repairs yourself, the answer is yes—and my goal is to guide you every step of the way. With the right tools, knowledge, and mindset, DIY car repair isn’t just possible, it’s rewarding.
DIY Car Maintenance Cost Calculator
Take control of your vehicle’s maintenance without breaking the bank. A Practical Guide to Simple Repairs, Safety, and Saving Money.
Why DIY Car Repair Matters
Auto shops can be expensive, and many small fixes don’t require a professional. From oil changes to brake pad replacements, everyday drivers are discovering that they can handle these jobs safely at home. The benefits go beyond saving money—you also gain confidence, extend the life of your vehicle, and understand your car on a deeper level.
Safety First
Before diving into any project, safety is the number one rule. Always use:
- Safety goggles and gloves
- A quality jack with jack stands
- Wheel chocks for stability
- A fire extinguisher nearby
- And remember—never work under a car supported by a jack alone. These basic steps ensure every repair stays safe and stress-free.
Essential Tools for Every DIY Mechanic
A solid toolkit is the backbone of all car maintenance at home. Here’s what I recommend keeping handy:
-
Socket and ratchet set (metric and standard)
-
Combination wrenches and screwdrivers
-
Torque wrench (critical for brake and engine work)
-
Pliers, vice grips, and a bright work light
-
OBD-II scanner to read error codes
With these tools, most common jobs are within reach.
Beginner-Friendly Repairs
Start with tasks that build your confidence:
-
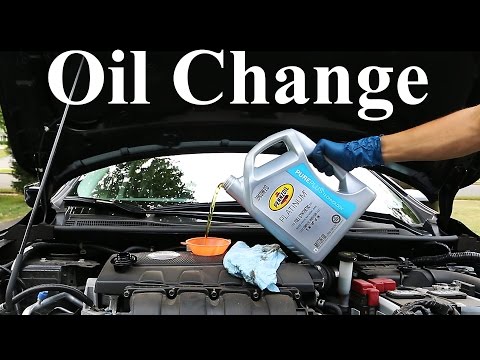
Oil & Filter Changes: One of the most important and straightforward ways to protect your engine.
-
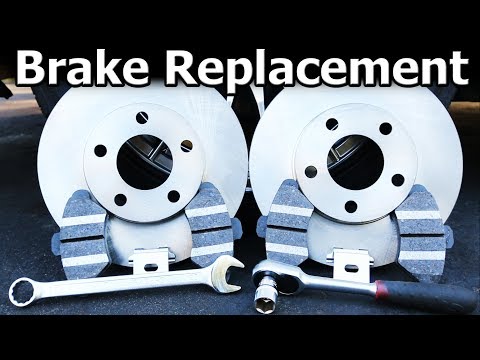
Brake Pad Replacement: Saves hundreds of dollars while keeping your vehicle safe.
-
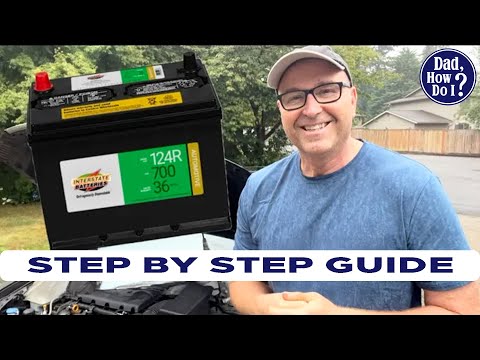
Battery Swaps: A quick fix that restores reliability and prevents roadside headaches.
Each of these projects not only saves money but also teaches you valuable skills you’ll use again and again. Visit blog
DIY Auto Repair Starter Guide 🚗🔧
Learn the most common car maintenance jobs you can safely do at home — even if you’ve never picked up a wrench before. This beginner-friendly guide helps you avoid overpriced repairs and unnecessary shop visits.
- ✔ Tools every DIY car owner should own
- ✔ Step-by-step maintenance checklist
- ✔ What mechanics don’t always tell you
- ✔ Mistakes that cost beginners money
💡 Average users save $500–$1,500/year by doing basic maintenance themselves.
Instant download • No subscriptions • Beginner friendly
Know Your Limits
Not all repairs should be done in your driveway. Complex jobs—like transmission work, advanced electrical systems, or suspension alignment—are best left to professionals. Part of being a smart DIYer is knowing when expert help is worth the investment.
Smart Tips for Success
-
Keep a maintenance log of every job done.
-
Label bolts and parts during disassembly.
-
Always use manufacturer torque specs.
-
Clean battery terminals with a simple baking soda mix.
-
Try quick fixes like polishing headlights with toothpaste or pulling dents with a plunger.
These simple tricks add up to big wins in your car’s long-term care.
The Value of DIY
When you embrace DIY auto repair, you’re not just saving money—you’re building independence and peace of mind. Small issues are easier to spot, maintenance becomes second nature, and you’ll never feel powerless when a warning light pops up.
Final Thoughts
At Easy Auto Solutions, I believe anyone can learn to handle basic car repairs. This blog is here to share knowledge, step-by-step guides, and practical auto maintenance tips that make a difference. Grab your tools, stay safe, and remember: every repair you complete is one more step toward becoming a confident, capable car owner.
Easy Auto Solutions (easyautosolutions.blogspot.com) is not an auto-loans site—it’s a DIY car repair and maintenance blog, offering clear,
step-by-step guides, safety tips, checklists, related resources, and even an AI-powered chatbot as well as other AI powered tools
to help troubleshoot issues. It empowers car owners to save money by performing routine repairs at home—like oil
changes, brake pad replacements, battery swaps—while learning valuable skills and staying safe.
A Comprehensive Guide to Fixing Your Own Vehicle
In an era where vehicle maintenance costs are steadily rising, many car owners are turning to do-it-yourself (DIY) repairs to save money and gain a deeper understanding of their vehicles. Embarking on DIY car repairs can be both rewarding and cost-effective, but it requires proper knowledge, the right tools, and a strong emphasis on safety.


Knowing When to Seek Professional Help While many repairs can be done at home, certain tasks require professional expertise: Transmission Repairs: Due to their complexity, it's advisable to leave transmission issues to professionals. Advanced Electrical Work: Modern vehicles have intricate electrical systems that can be challenging to diagnose and repair without specialized equipment. Suspension and Steering Components: These systems are critical for safety and require precise adjustments. Attempting complex repairs without adequate knowledge can lead to further damage or safety risks.
Fluid Type & Capacity
Torque Specifications
DIY Car Repair Guide
Repair Video Tutorials
One lesser-known but incredibly useful tip in DIY auto repair is the importance of dielectric grease when working with electrical connectors. Many DIYers overlook this inexpensive, non-conductive silicone-based compound, but it plays a crucial role in preventing corrosion, moisture intrusion, and oxidation in electrical systems. Applying a small amount of dielectric grease to spark plug boots, battery terminals, and sensor connectors can greatly improve reliability and extend the life of these components—especially in humid or coastal climates. It doesn't conduct electricity, so it won’t interfere with connections, but it acts as a protective barrier, making it easier to disconnect components later and reduce any risk of misfires or erratic sensor readings.
AI Mechanic – AI Car Repair Guide
AI: How can I assist with your car repair today?
DIY Car Repair: Share Your Tips!
Got your own car repair tips or stories? Share them below and help others learn how to fix their ride in a compact space.
Rev Up Your DIY Car Repair: Hidden Insights & Smart Car Maintenance Tips
Taking on DIY car repair at home isn’t just about saving money—it’s about building confidence under the hood. Many people don’t realize that a simple oil change can reveal fluid leaks before they escalate, with black stains hinting at oil, reddish-brown at transmission fluid, and green signaling a coolant issue. Another surprising fact: home mechanics often underestimate the safety risks—around five people die annually from DIY car accidents, and hundreds more are hospitalized from mishaps like jack stand failures or carbon monoxide exposure. Also, investing in a proper tool set isn't just for show—professional mechanics often spend over US $20,000 on their gear, and lacking these tools at home can lead to broken parts or botched repairs . But with the right gear and guidelines—think safety glasses, wheel chocks, open garage ventilation—you can transform your driveway into a safe and effective repair station.
Choosing which jobs to tackle yourself can save big bucks—but it takes insight to know your limits. DIY brake pad replacement can cut labor costs in half, but getting the timing belt wrong could cost $2,000–$5,000 in engine damage. And it’s not just about tools—modern vehicles hide complex sensors and computer systems, and incorrect handling may even void warranties or trigger electrical fires, especially on older cars where 77% of vehicle fires occur. On the flip side, 30% of drivers in early 2024 said they’d attempt repairs themselves first—a jump from 26% in 2020—driven by YouTube tutorials and repair guides. Armed with accurate service manuals, proper parts, and solid safety habits, DIYers can master maintenance like air filters and bulbs, while avoiding pitfalls by deferring complex jobs to professionals.

Predictive Maintenance
Predictive Maintenance uses data and intelligent models to anticipate equipment issues before they occur. By acting early, organizations reduce downtime, extend asset life, and improve operational efficiency.
General Maintenance Advice: Diagnostic & Troubleshooting
🔴 Critical Troubleshooting
- Use an OBD‑II scanner wisely Start with reading DTC codes—but remember, a code isn’t a diagnosis. Use it to guide targeted tests. For example, a P0131 O₂ sensor code may stem from wiring issues or a lean condition—not just a bad sensor :contentReference[oaicite:1]{index=1}. Access OEM flowcharts via databases like ALLDATA DIY for verified repair paths
- Battery, starter & ignition tests For no-crank or click conditions, test battery voltage (~12.6 V at rest), clean terminals, and check starter solenoid. Dim interior lights or whirring noises often point to starter or ignition faults
- Cooling system deep inspection Address overheating by checking coolant level, radiator fan operation, hoses, cap, water pump, and thermostat. Use OBD live sensor data to verify coolant temp readings, and inspect radiator fins for debris
🟡 Important Diagnostics
- Test electrical & sensor circuits With a multimeter, check sensor voltages/resistance (e.g., coolant-temp sensor should drop resistance as engine warms) and ensure alternator output stays 13.7–14.7 V when running
- Observe sounds, smells & performance Identify symptom patterns: knocking could imply ignition timing or fuel mix issues; squealing belts point to wear or tension fault; hissing hints at vacuum or cooling leaks; rotten-egg odors suggest catalytic converter problems
- Check fuel & electrical systems If rough idle or low fuel economy occurs, inspect fuel pressure, filter, and injectors. Inspect fuses, relays, and alternator output if dashboard lights flicker or behave erratically
🟢 Useful Preventive Tips
- Research manufacturer-specific issues Visit forums, repair manual databases, and model-specific blogs to learn common failure modes before troubleshooting begins
- Keep detailed diagnostic records Log trouble codes, sensor data, test results, and component specs. Comparing to factory values helps track intermittent issues more effectively
- Perform regular inspections Schedule routine checks of fluid levels, belts, hoses, electrical connections, and radiator cleanliness. These basic steps help catch faults before they escalate
Unexpected DIY Car Repair Hacks
Here are additional clever DIY car repair tips that most drivers don’t know—straightforward, cost-effective, and quick to learn: Clean battery terminals with baking soda and water – mix into a paste to remove corrosion and improve electrical flow. Use a staple or small flat tool to realign wiper blades – fix juddering blades by gently twisting the frame, not replacing them. Unplug the mass airflow sensor (MAF) temporarily – if the engine stumbles, disconnecting the MAF forces the system into default mode, letting you limp to safety. De‑fog headlights using toothpaste – a gentle abrasive that clears oxidation and boosts night visibility. Pop small dents with a petroleum‑jelly‑lubricated plunger – suction pulls dents out without damaging paint. Revive door trim with cooking oil or silicone lubricant – restores faded plastic cheaply . Use cat litter or kitty-ledge on icy tires – carry a sock filled with cat litter to improve traction in winter. Defrost windshields with half a potato – rub the cut side across the glass to slow ice buildup overnight.

Brake Pad Replacement Guide
Step‑by‑Step Instructions
- Prepare & Ensure SafetyPark on a flat surface, engage parking brake, chock wheels. Loosen lug nuts, jack up vehicle, and place on jack stands. Wear gloves and eye protection.
- Remove the WheelTake off the lug nuts and wheel to access the caliper and pads.
- Access the CaliperRemove the caliper slide-pins (usually bottom one), pivot caliper upward—don’t disconnect brake lines.
- Remove Old Pads & InspectSlide out worn pads. Check rotors for grooves or minimum thickness (~6 mm). Replace if needed.
- Install New HardwareFit new retaining clips and apply high-temp brake grease to clips and pad backs to minimize noise.
- Insert New PadsPlace pads into bracket, ensuring correct orientation and sensor alignment.
- Retract the Caliper PistonsUse a C-clamp or piston tool to compress pistons—watch brake fluid reservoir for overflow.
- Reinstall CaliperLower caliper over new pads, torque slide-pins to spec, then refit the wheel.
- Refill & Bleed if NecessaryCheck brake fluid level, top up as needed, and pump the pedal to seat the pads.
- Repeat & Test‑DriveComplete the same steps on remaining wheels, then perform a low-speed test drive to verify firm pedal feel and smooth braking.
Tools & Materials Needed
- Jack, jack stands, wheel chocks, lug wrench
- C‑clamp or piston press tool
- Socket set/wrench
- New brake pads (and rotors if needed)
- High-temp brake grease
- Brake fluid & turkey baster (for reservoir adjustment)
- Safety goggles and gloves
This guide applies to most common cars with sliding or fixed calipers. Expect 1–3 hours per axle, depending on vehicle and experience.
Tip: Always follow your specific vehicle’s service manual—torque specs, brake fluid type, and any caliper differences vary per model.
🔋 How to Replace a Car Battery – Step by Step
- 🔧 Prep Your Car
Park securely, engage the parking brake, turn off the engine. Open the hood and locate the battery. - ⚠️ Disconnect Terminals
Loosen and remove the negative (–) cable first, then the positive (+). Keep cables away from metal and each other. - 🏗 Remove Hold‑Down
Use a wrench to undo the clamp or bracket and lift out the old battery (it can be 40–60 lb / 18–27 kg). - 🧼 Clean Tray & Terminals
Mix baking soda and water to scrub away corrosion. Rinse and dry thoroughly. - 🔩 Install New Battery
Set the new battery in place with correct polarity (+/–) and fasten the hold‑down snugly to prevent shifting. - 🔌 Reconnect Cables
Attach the positive (+) cable first, then the negative (–). Ensure a tight connection. - ✅ Final Check
Remove tools from the engine bay, close the hood, and start the car—check it starts smoothly. - ♻️ Recycle Old Battery
Take it back for proper recycling and reclaim your core charge ($10–20).
Pro tip: Disconnect the negative terminal first and reconnect it last to avoid sparks. Consider using a memory‑saver to preserve your car’s onboard settings—skip this and you may lose things like radio presets and nav memory.
DIY Engine Oil Change — Safety First
🛠️ Tools & Materials
- Correct oil type & quantity (owner’s manual)
- New oil filter
- Wrench/socket & filter wrench (optional)
- Oil drain pan & funnel
- Gloves, safety glasses, rags
- Jack + stands or sturdy ramps, wheel chocks
- Crush washer for drain plug
1. Park & Prep
Park on a level surface, set parking brake, and chock rear wheels. Briefly warm engine for better oil flow, then let it cool to a safe temperature.
2. Lift Safely
Use ramps or jack stands—never rely only on the jack. After lifting, gently rock the car to confirm stability before crawling underneath.
3. Drain Old Oil
Place pan under the drain plug, wear gloves, and slowly loosen plug to control hot oil release. Let it drain fully (~10–20 minutes). Replace crush washer to avoid leaks.
4. Replace Oil Filter
Coat new filter gasket with fresh oil. Remove old filter carefully (expect drips), clean the mounting surface, and hand-tighten new filter until snug + ¾ turn.
5. Reinstall & Refill
Install drain plug with new crush washer, lower vehicle, then refill engine with correct oil volume via funnel—avoid overfilling.
6. Check Leaks & Oil Level
Start engine and idle ~30 seconds. Check underneath for leaks, then shut off. Wait ~3 minutes, use dipstick to verify level; top up if needed.
7. Clean Up & Recycle
Wipe spilled oil, seal and label used oil, and recycle at an auto-parts store or recycling centre.
🔐 Safety Tips
- Always wear gloves and safety glasses to protect against burns and leaks.
- Never work beneath a car supported only by a jack—use proper stands.
- Inspect for double gaskets—old filter gaskets stuck to the engine can cause leaks or engine failure :contentReference[oaicite:2]{index=2}.
- Use kitty litter or drip trays to soak up spills.
💡 Bonus Tips
- Consider a Fumoto-style drain valve to simplify oil draining (avoids crawling under car).
- Record date and mileage on the filter for maintenance tracking.
- Keep a log or set a phone reminder—change oil every ~3,000–5,000 miles or per manual :contentReference[oaicite:3]{index=3}.
🚗 Quick Fix or Full Overhaul?
We’ve got you covered! Discover today’s pro tips to keep your car running like new – and don’t miss tomorrow’s exclusive guide on saving BIG on repairs! 🔧💰
Read today's tips
Nice Blog! Searching for a car wash store in Dhakoli? We offer professional and affordable vehicle cleaning services tailored to your needs.Equipped with advanced washing systems and eco-friendly products, these stores ensure a thorough exterior and interior cleaning that enhances your car’s appearance and protects its finish. From basic washes to premium detailing and polishing, services are delivered by trained staff with attention to detail. We offer quick service, doorstep options, and monthly packages for regular maintenance.
ReplyDeleteDIY auto repair tips are a game-changer for saving money and understanding your vehicle better. It’s similar to handling tech fixes on your own—I recently managed an iPhone 13 Pro backglass replacement and was surprised how much easier it was with the right guidance, just like car maintenance.
ReplyDeleteDIY auto repair tips are incredibly helpful for tackling minor issues and understanding your car better. But when a job goes beyond basic maintenance, finding a trusted professional matters. I found this reliable car mechanic near me who offers expert help without overcharging—great balance between DIY and pro support.
ReplyDeleteTechXa Malaysia discusses the cost and maintenance of air suspension systems, particularly in luxury cars like Mercedes-Benz. It explains common problems such as leaks, compressor failures, and uneven ride height, while outlining typical repair costs ranging from RM 5,000 to RM 50,000+ depending on parts and damage. The post also shares practical maintenance tips to extend suspension lifespan and prevent costly repairs. Its a great pleasure reading your post.
ReplyDeletewill help you more: airmatic
Great Job !
ReplyDeleteYou're in the right place. We provide 24-hour car towing and transport services within and outside Jubail Industrial City, with the nearest flatbed truck reaching you in minutes, wherever you are.
Emergency Towing Jubail